Tutorial
The Stem Cell Commons is a data management, analysis, and visualization platform designed to support analysts in managing common tasks in analysis and interpretation of biomedical data.
In this tutorial you will learn how to load data into the Stem Cell Commons, how to analyze it using workflows, and how to view analysis results using built-in visualization tools. Additionally, this tutorial demonstrates how to work with the data repository, how to use features that are supporting reproducible research, and how to use the collaboration tools of the Stem Cell Commons.
Preparation
To follow the steps of this tutorial, you will need a data set consisting of data files and a metadata file that is referencing your files.
Tutorial Data Set
This tutorial can be followed using the Tutorial Data Set, which consists of sample ChIP-seq data and their associated metadata file. Download the Tutorial Data Set files here:
Note the expanded instructions associated with some steps of the tutorial that pertain specifically to the Tutorial Data Set. Also, skip section 1. Creating a Metadata File since a metadata file is already provided within the Tutorial Data Set.
0. Accessing the Stem Cell Commons
- Go to the Stem Cell Commons Launch Pad and either
- create a new account:
- Click Register at the top right of the navigation bar (top of page)
- Provide the required details and then click the Register button below
- Wait to receive an account activation e-mail at the address provided during registration
- log in to an account:
- Click Login at the top right of the navigation bar
- Enter the Username or E-mail and Password provided during registration and click the Login button below
- create a new account:

1. Creating a Metadata File
- Create a metadata table within a delimited (e.g. tab-delimited) text file in which rows correspond to data files to be uploaded and columns provide metadata attributes (a template metadata file can be found here). The naming and ordering of the columns can be arbitrary, but the metadata table
- must have 3 columns to describe (1) sample identifiers, (2) filenames, (3) species identifiers
- Tip 1: Assigning these attributes to the first 3 columns of the table (same order as listed above) will slightly simplify the data set upload
- Tip 2: Filenames should refer to data files either located on your local computer (do not include the file path) or on a web server accessible via public URLs (provide the full URL)
- can contain as many additional columns as desired
- must provide column names as its first row
- must use column names that are unique, do not contain special characters, and are not the same as the following internally reserved metadata attribute names: Assay_uuid, Django_ct, Django_id, File_uuid, Genome_build, Id, Is_annotation, Name, Species, Study_uuid, Type
- Tip: Descriptive yet concise names will be most effective
Tutorial Data Set: skip this step since the tab-delimited
tutorial.tsvmetadata file is already provided - must have 3 columns to describe (1) sample identifiers, (2) filenames, (3) species identifiers
2. Uploading a Data Set
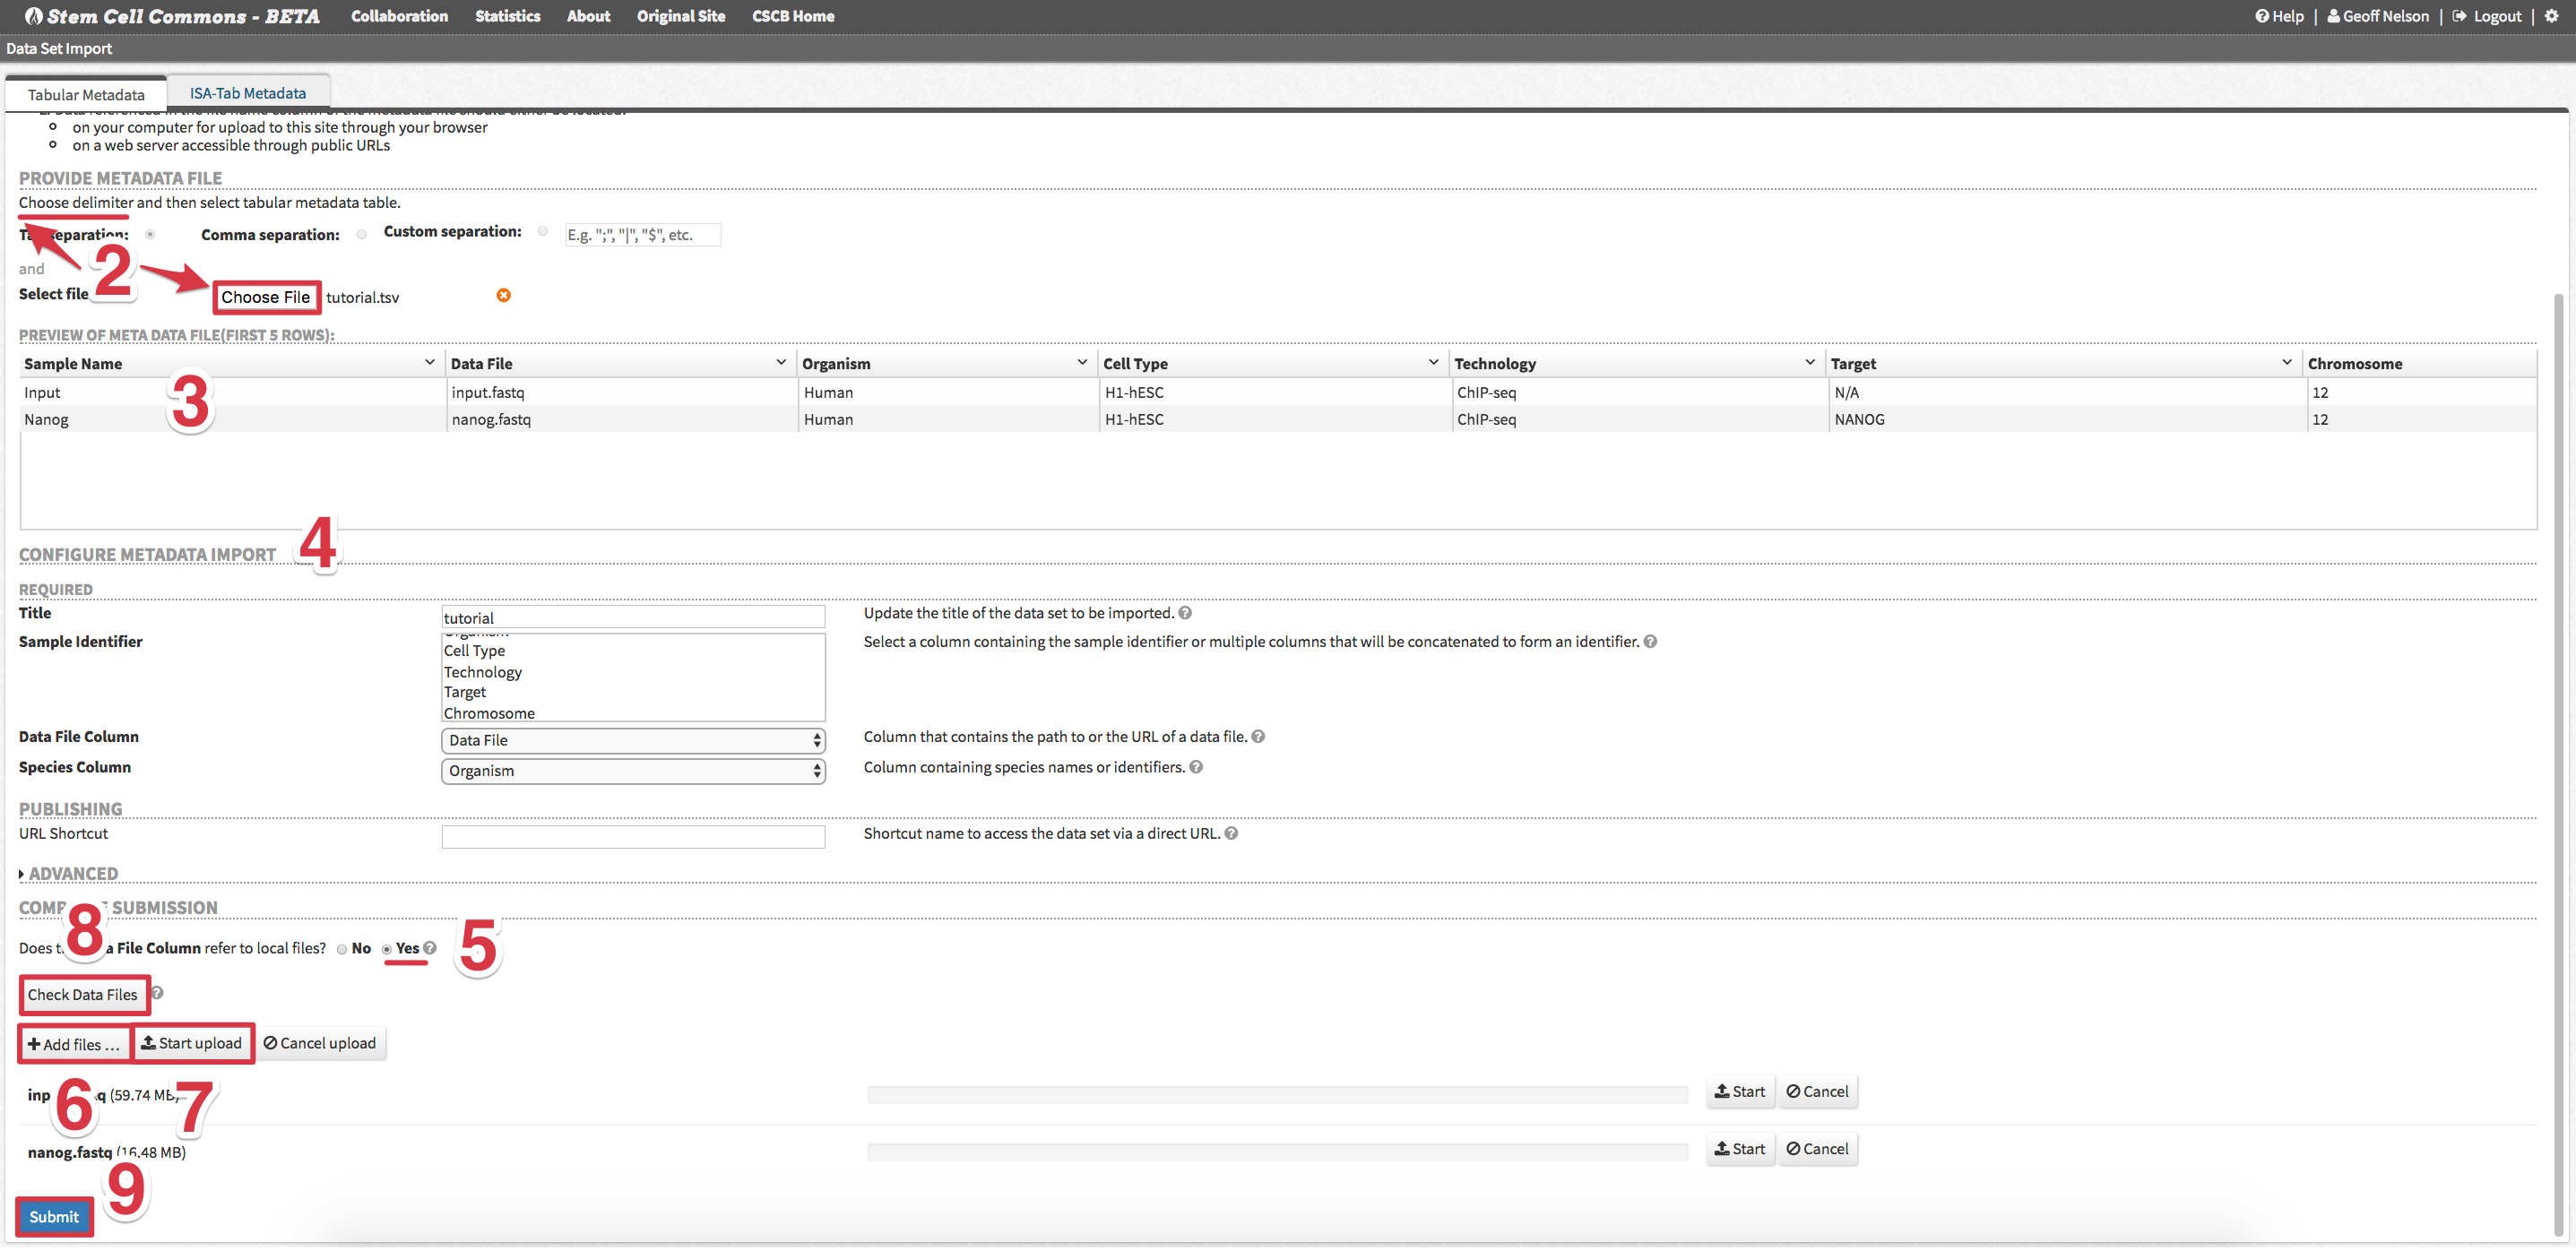
- From the Launch Pad, Click Upload from the Data Sets panel

- First choose delimiter used in the metadata file and then upload the file
Tutorial Data Set: upload the tab-delimited
tutorial.tsvmetadata file - Check metadata Preview of Meta Data File for accuracy (note: only first 5 samples are displayed)
- Review Configure Metadata Import and make changes as needed
Tutorial Data Set: no changes are needed
- Under Complete Submission, select Yes for Does the Data File Column refer to local files?
- Click Add files… button and select data files corresponding to the metadata
Tutorial Data Set: upload the
input.fastqandnanog.fastqdata files - Click Start upload to begin uploading all selected data files
- After all data files have uploaded, click Check Data Files to confirm all files are now on the server
- Click Submit to upload the new data set (metadata + data files)
3. Viewing a Data Set Summary in the Data Set Browser
- Return to the Launch Pad and click on the newly uploaded data set title. The Data Set Browser will display a summary of the data set.
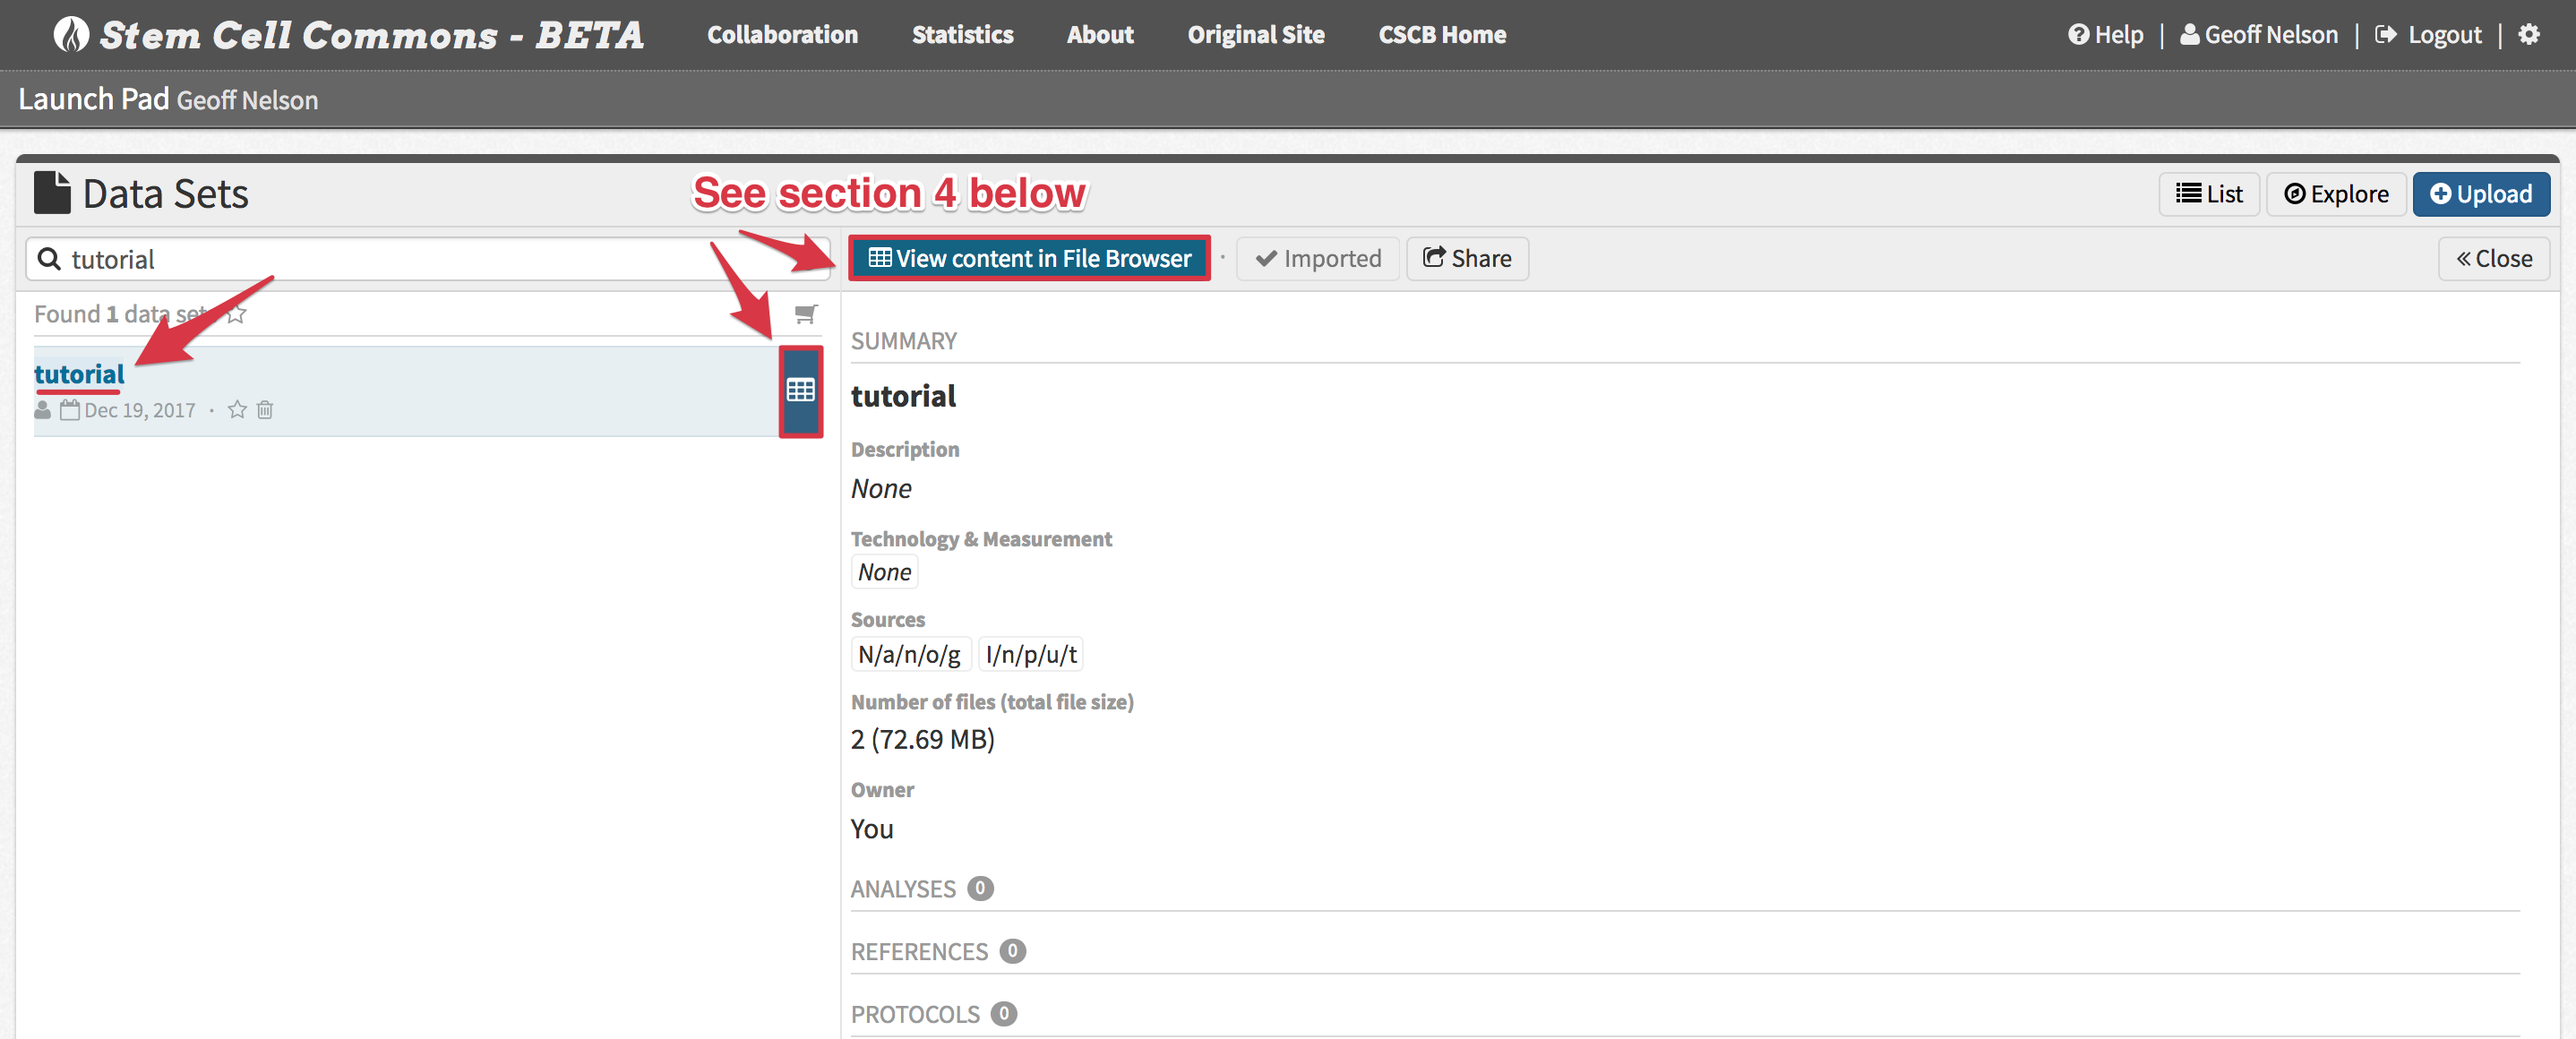
4. Exploring Data Set Contents in the File Browser
- From the Data Set Browser, click View Content in File Browser (or the equivalent icon in the Data Sets panel) to view the individual data files belonging to the data set:
- Files can be filtered based on attributes (e.g. column names of the related metadata file) using the Attribute Filter in the left-hand panel
- Files can also be sorted according to attributes (both ascending and descending) by clicking the attribute names (i.e. column headers)

5. Launching an Analysis
- From the File Browser, click the Show Tool Panel button above the left-hand panel

- Select one of the analysis workflows below using the drop-down menu in the Tool Panel, follow their workflow-specific steps below, and then continue with step 3
Tutorial Data Set: follow section 5. Launching an Analysis twice, first launching the FastQC workflow and afterwards the ChIP-seq Peak Calling - Human workflow (details below)
- FastQC
- Select file(s) to analyze by first clicking the arrow next to a file and then ticking its checkbox in the Select Tool Input popover
Tutorial Data Set: select both
input.fastqandnanog.fastq - ChIP-seq Peak Calling - Human
 - Select files to analyze by first clicking the arrow next to a file and then ticking its checkbox in the Select Tool Input popover, appropriately assigning Treatment FASTQ and Control FASTQ inputs
Tutorial Data Set: assign
input.fastqto the Control FASTQ andnanog.fastqto the Treatment FASTQ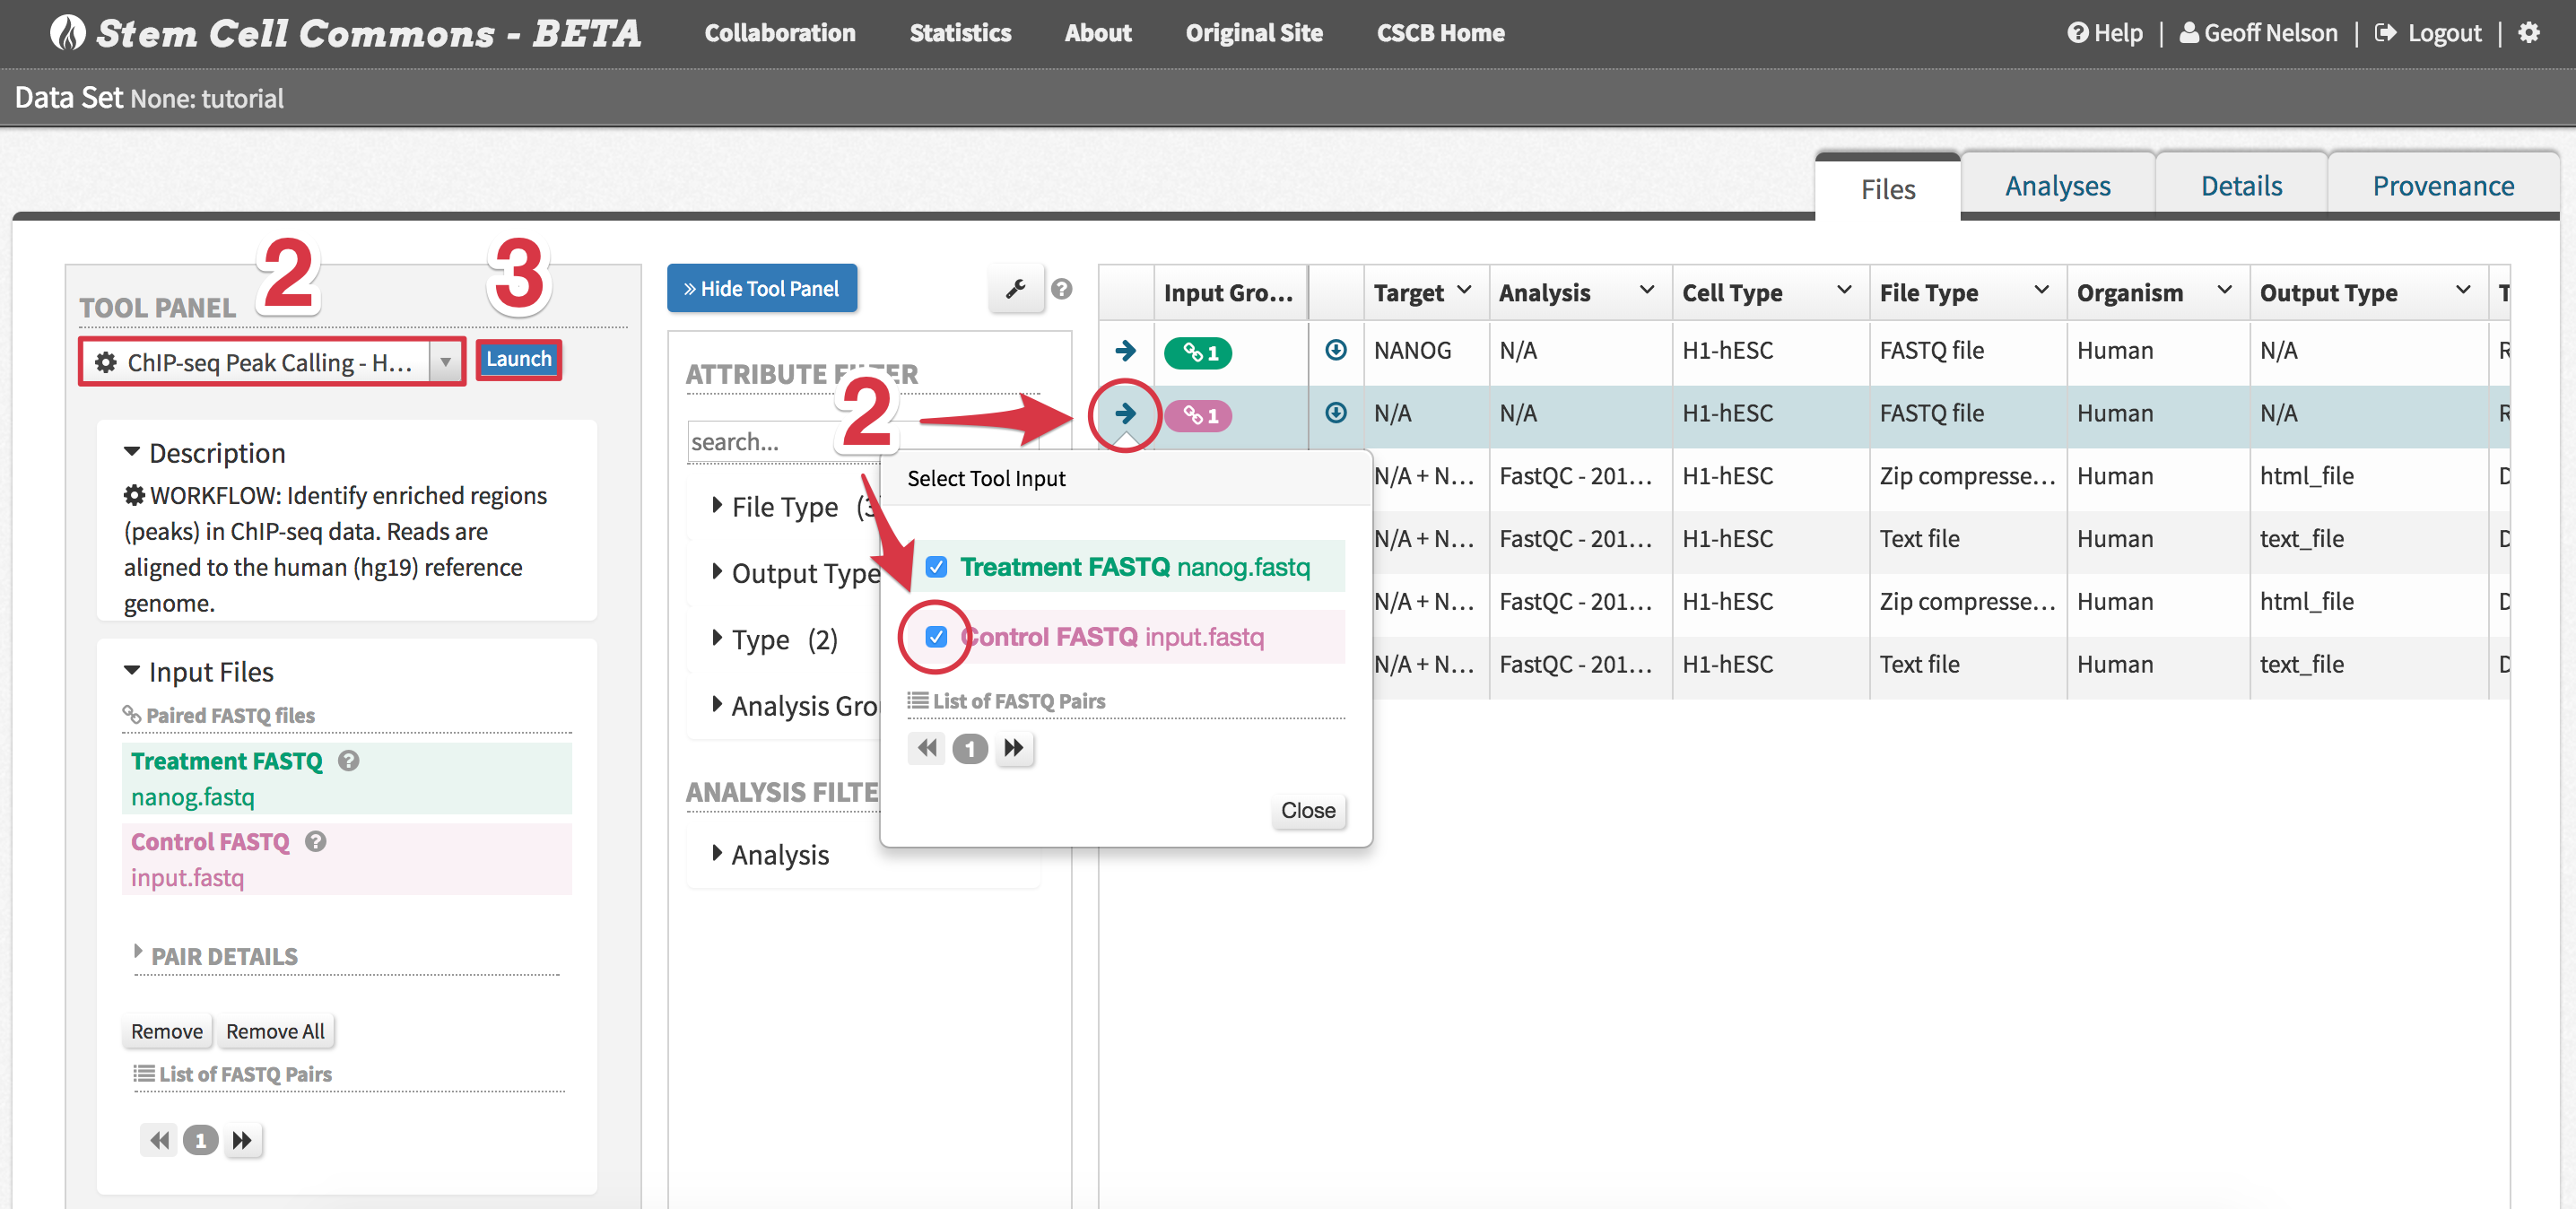
- Click the Launch button
- Monitor analysis progress within the File Browser
- Tip: This Analyses tab within the File Browser can also be directly accessed by clicking the analysis name from the Analyses panel on the Launch Pad

- Tip: This Analyses tab within the File Browser can also be directly accessed by clicking the analysis name from the Analyses panel on the Launch Pad
6. Viewing Analysis Results
- Upon successful completion of an analysis, click its name from the Analyses tab within the File Browser

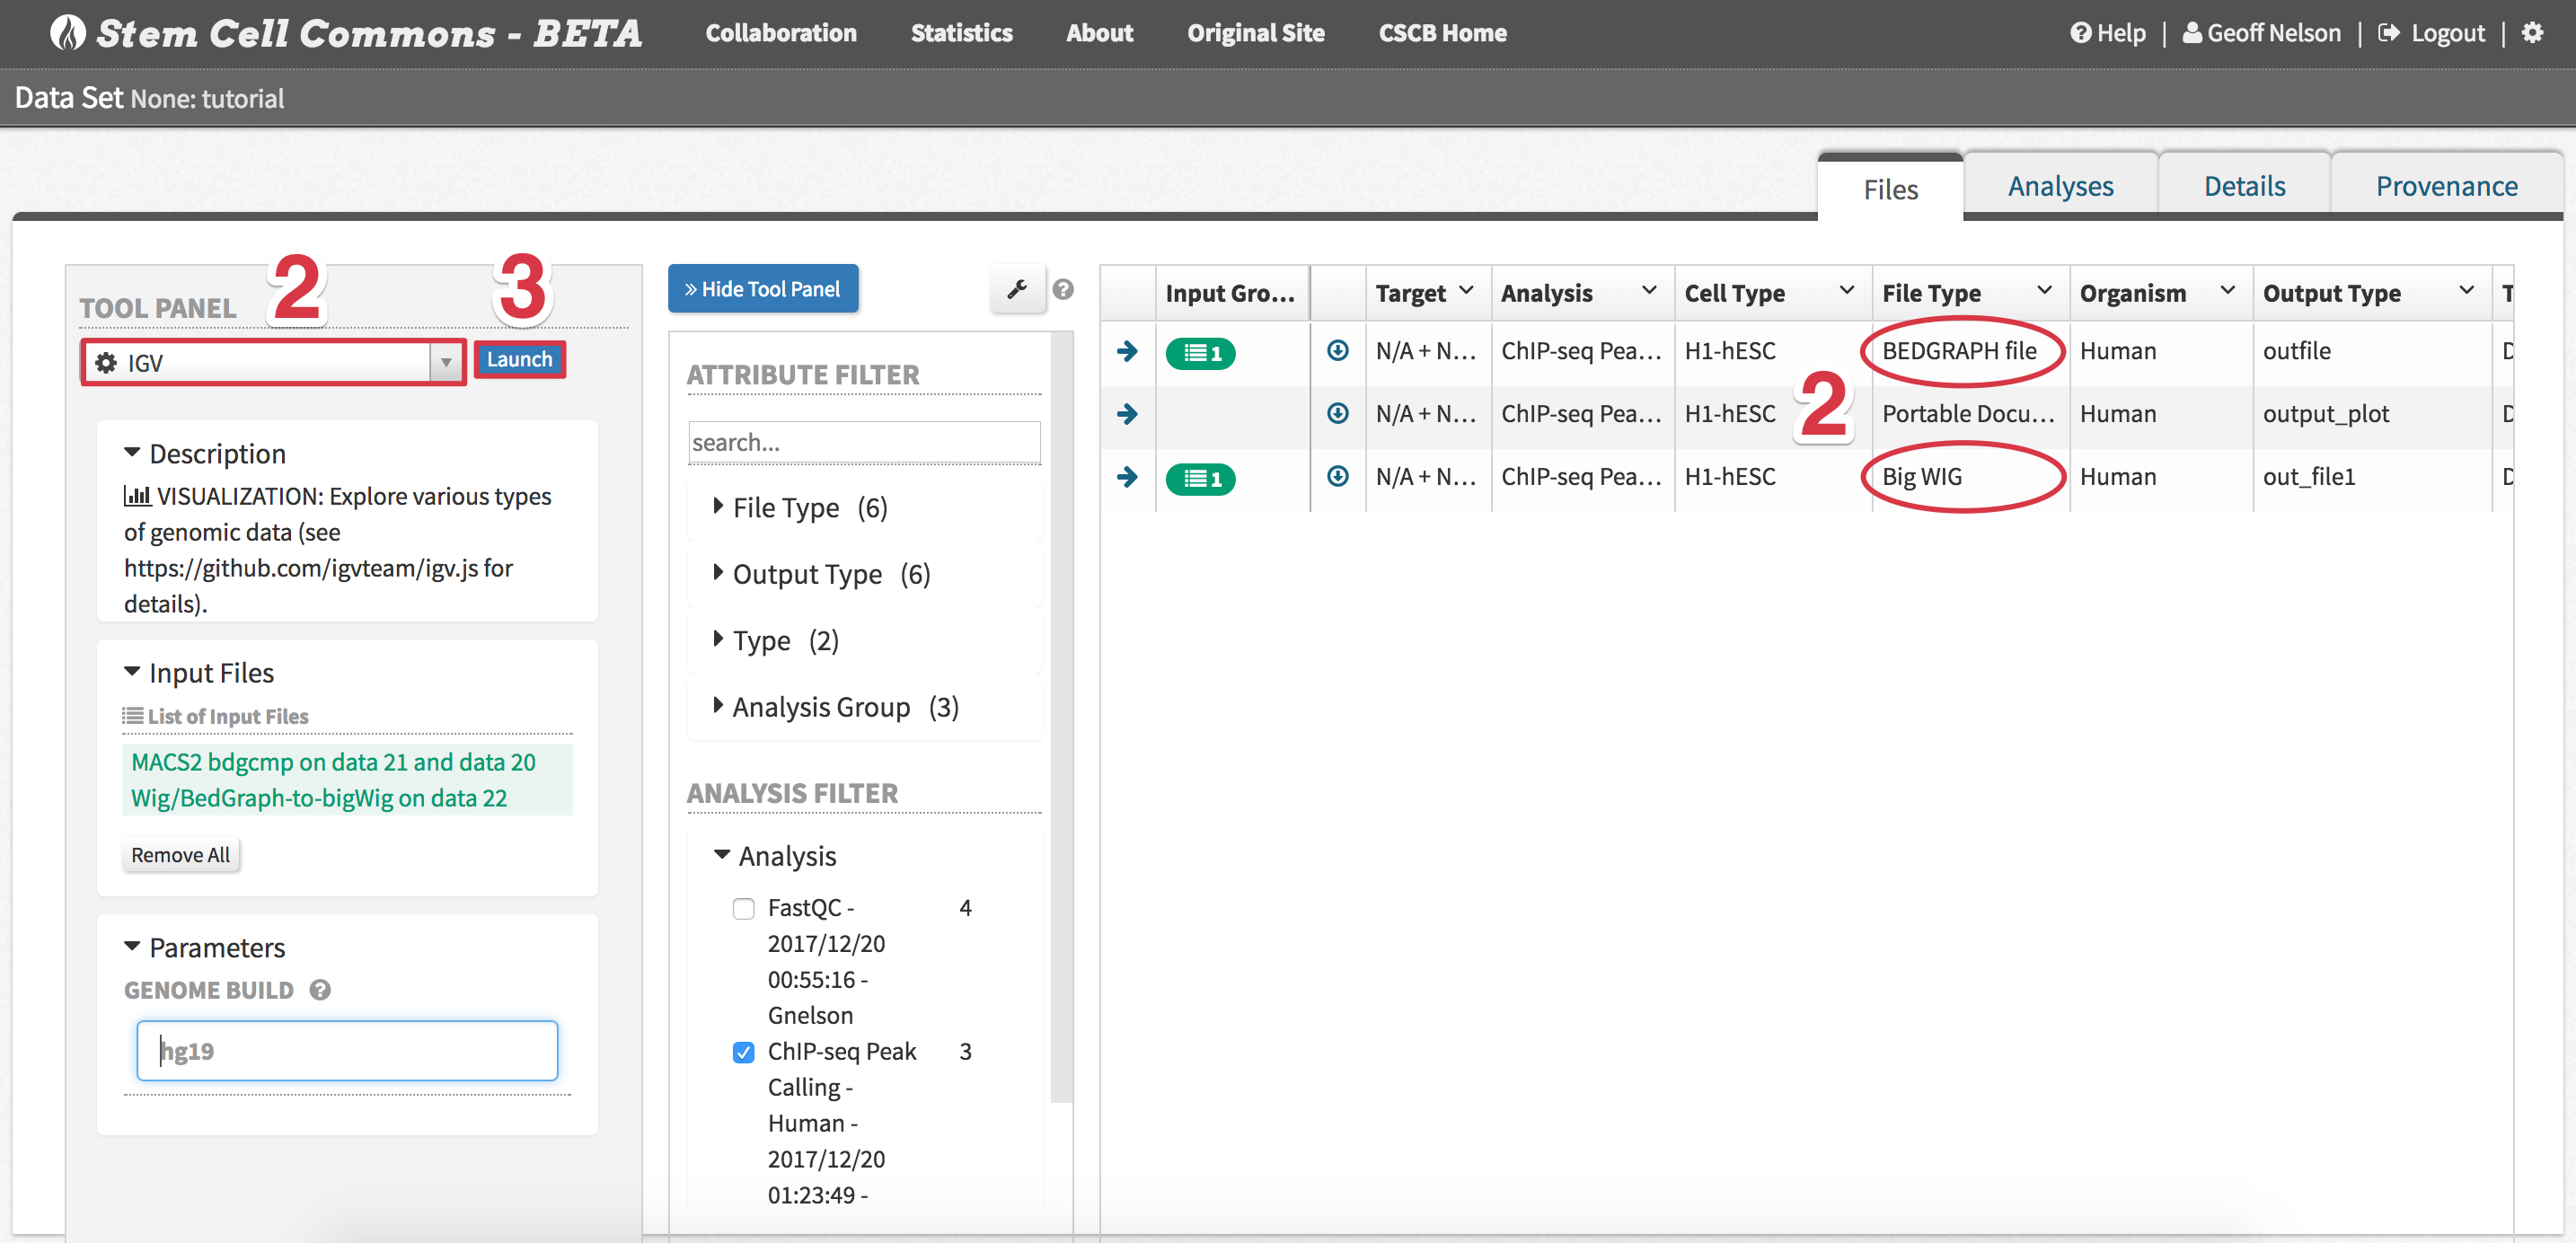
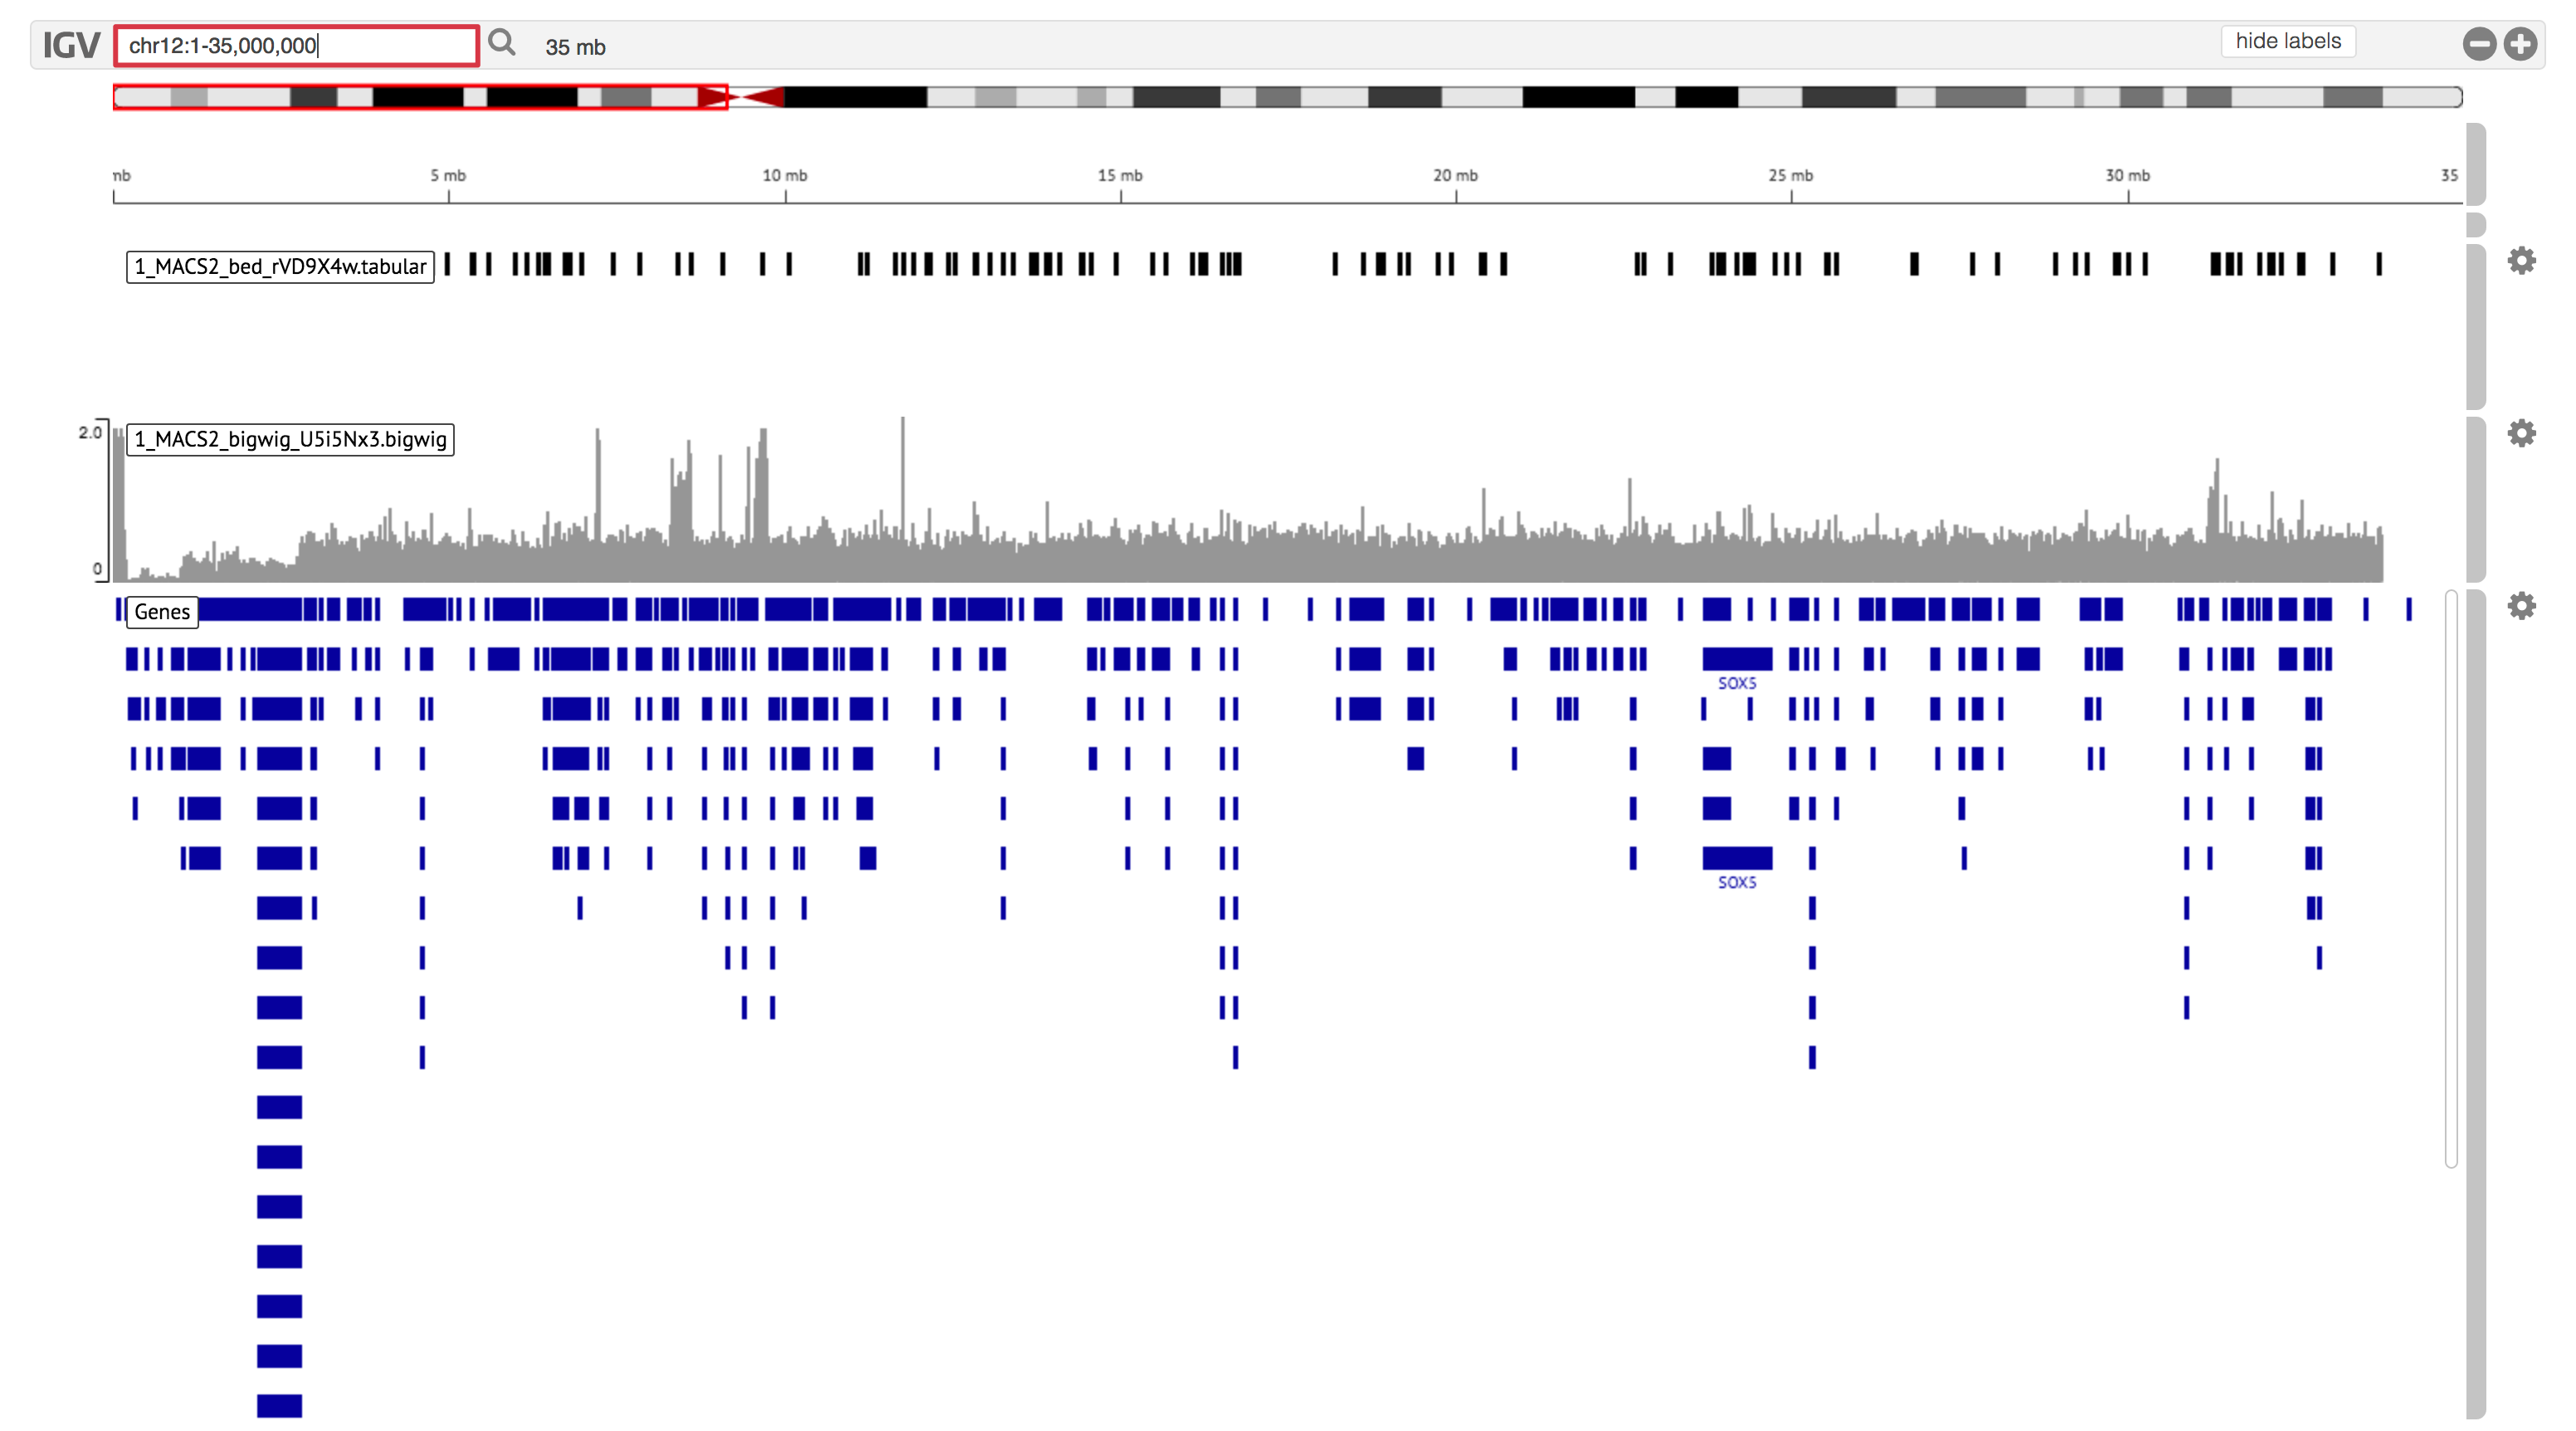
- To visualize peak calling results, select input files to be displayed as tracks in IGV (e.g. BED, bigWig)
- Tip: To download any results file, click the down-pointing arrow icon associated with that file
- Launch IGV
Tutorial Data Set: search chr12:1-35,000,000 in the IGV search box (top left) to see all the peaks__
7. Reviewing Data Provenance
- Display a data set in the File Browser (see sections 3. Viewing a Data Set Summary in the Data Set Browser and 4. Exploring Data Set Contents in the File Browser)
- Select the Provenance tab
- Review the displayed nodes to track the analysis history of the data set – each new analysis will add a new node to the provenance graph
8. Creating and Modifying a Collaboration Group
- Click Collaboration within the navigation bar and then
- create a new group
- Click the Add button in the top right of the Groups panel
- Choose a unique Group name and click Create group
- Select the new group within the Groups panel to display current members of the group within the Members panel
- invite new group members
- Select a group within the Groups panel and click the Invite button in the top right of the Members panel
- Provide a Recipient email address belonging to the new group member and click Send Invite
- The new group member will then receive an invitation e-mail with instructions on how to join the group

- create a new group
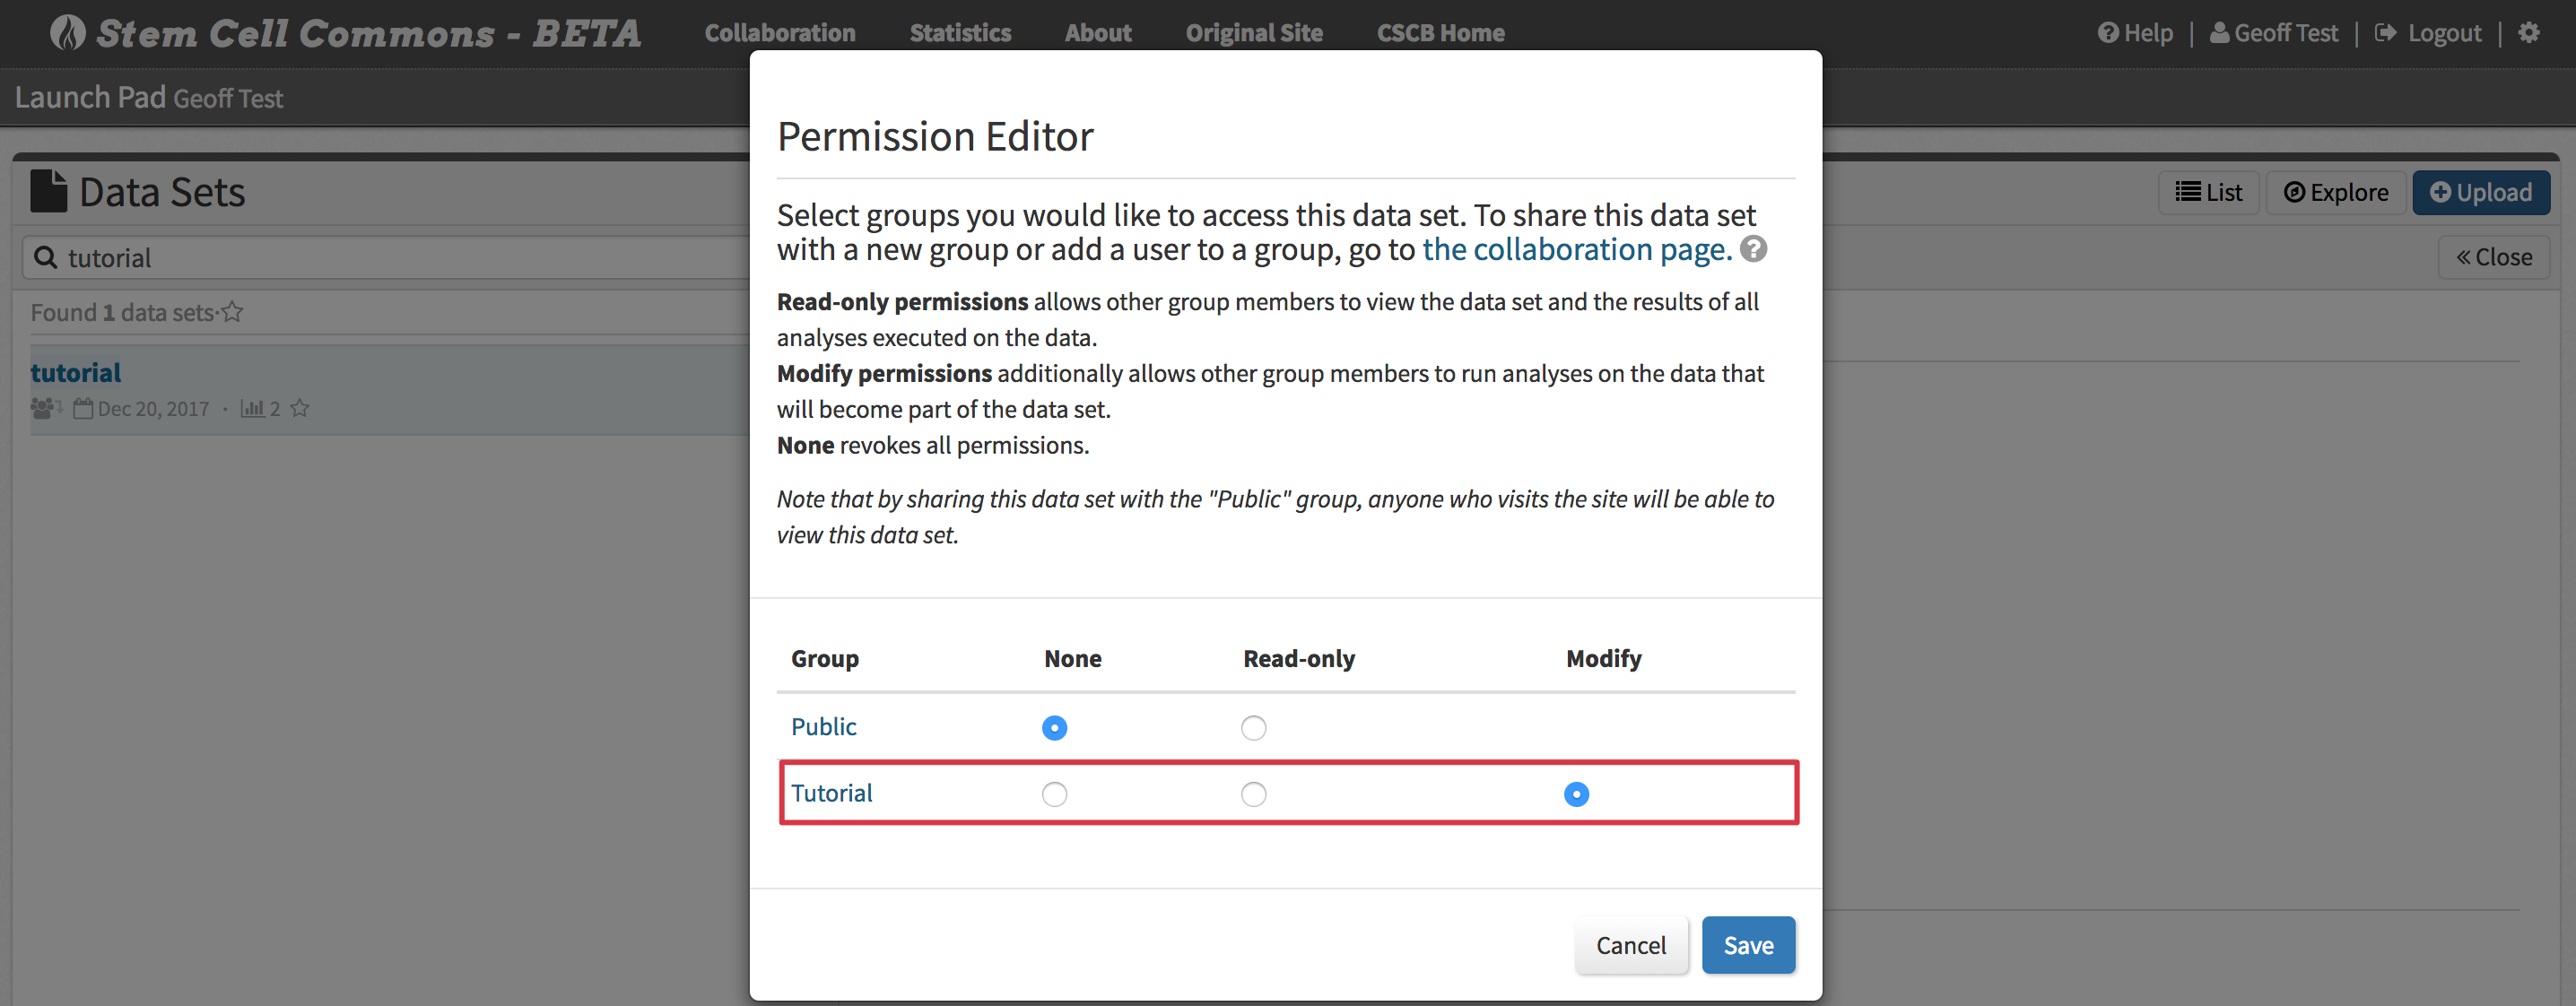
9. Sharing a Data Set with a Collaboration Group
- Display a data set in the Data Set Browser (see section 3. Viewing a Data Set Summary in the Data Set Browser)
- Click Share above the data set summary
- Assign Read-only or Modify permissions for that data set to any groups to which you belong
10. Deleting an Analysis or Data Set
- To delete an analysis only, click the trash can icon in the Analyses panel on the Launch Pad. To delete a data set and all its associated analyses, click the trash can icon in the Data Sets panel on the Launch Pad
